
A Project Using Trace: Deleting to Simplify
/
Brian Wolf, CPF
Art & Education Ambassador
Wizard International
Here is the scene: You are browsing through the CutArt™ categories in FrameShop looking for a small motif for a decorative project like the one shown here.

You see a CutArt with several elements. One element within the group catches your eye as the perfect motif. However, it is not possible to use only the one element. You know that you must use the entire CutArt. So you sigh wistfully and continue searching.
But, there is hope. It is possible to open the CutArt in Trace, delete all the unwanted elements, and save the remaining element—the one that caught your eye—as an entirely new CutArt that you can use in this and in future projects.
This example project will explain 2 of the functions of Trace that will be a part of most projects: Delete and Save.
Simplifying CutArt to Use Just One Element
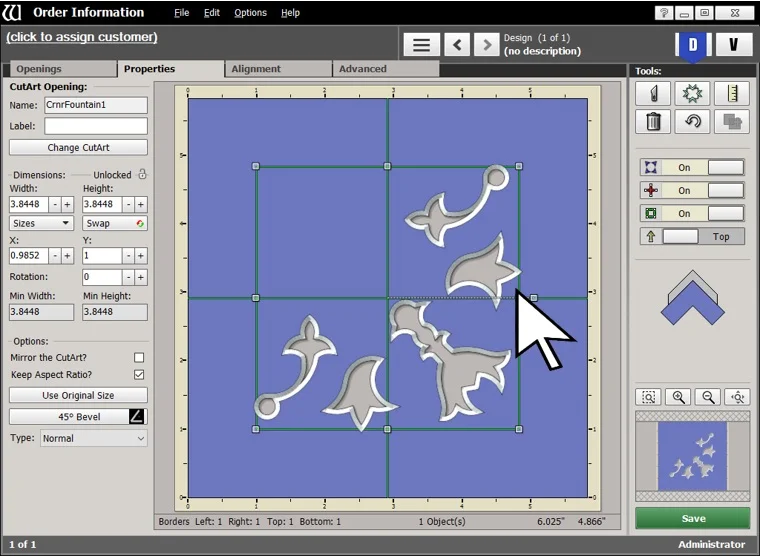
In the Deco Category, there is a CutArt named “CrnrFountain1”. In the image below, the arrow at the right points to the part of the CutArt that would be the perfect element for this project.
Here’s how to get started:
Add the CutArt to a design.
Send the design to Trace.
Deleting An Individual Item
Remember how functions in Trace generally operate: Select an item, then click the button for the function. Delete works exactly like this.
Select an item. It will turn white.
Then click the Delete button under Tools at the upper right. The selected item will disappear.
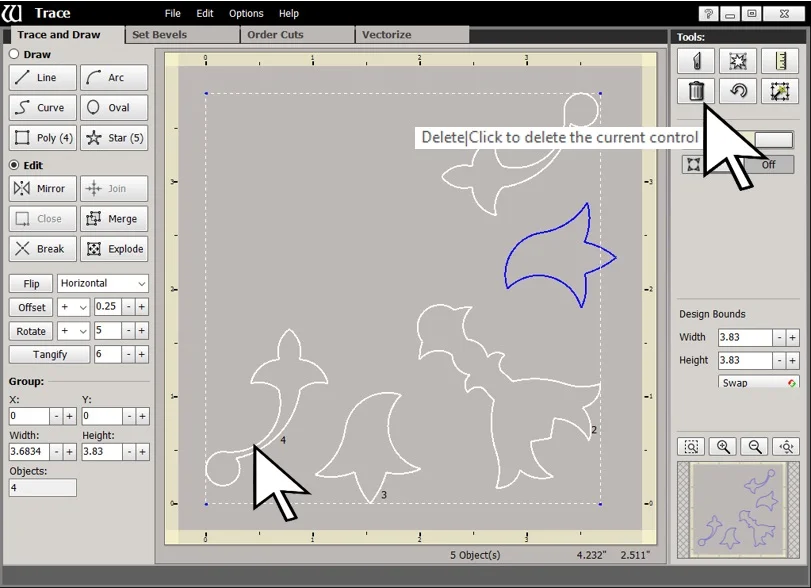
In this illustration, the 4 unwanted elements are selected, and the arrow at the right points to the Delete button. If you have experience using PathTrace, it will be a surprise to see that multiple items are now selected using FrameShop Trace.
Selecting & Deleting Multiple Items
In Trace, there is an option to select multiple items. This can help complex deleting projects proceed more quickly. In this illustration, all the unwanted items have been selected.
Select one item to be deleted. It will turn white.
Hold the Control key on the keyboard.
Continue selecting more items by clicking on them. Each item will turn white and remain white as you select more items.
If you select an item by mistake, click on it again to de-select it.Once all the items are selected, release the Control key. In the illustration above, all 4 items that need to be deleted are selected.
Click the Delete button on the right. All the selected items will disappear.
Saving the New CutArt
This illustration shows the remaining element all alone in the work area. This is the CutArt we want to save and use.

The next step is to Save—and then use—the new CutArt.
Click File at the top left.
The most practical saving choice is Save To Database. This puts the new CutArt into the database, and it will be ready to use in FrameShop without further processing.
Choose the Save to Database option.
The Save CutArt dialog box will open. First choose a Category.
To save the new CutArt into an existing Category, click the drop down arrow at the right of the Category Name field. Select any Category from the list. It is also possible to create a new Category from this dialog box by simply entering a new Category Name. Decide for yourself if the new CutArt will be logical in an existing Category, or if it would be easier to locate in a new Category. In this example, the new Category is called “Accents 2”.
Enter a name for the new CutArt, and click Save at the bottom of the dialog box.
The Next Logical Question
We now have the new CutArt, but how do we make the design shown at the beginning?
There are no Trace processes—the process in the design screen is probably familiar to many users of MatDesigner. However, there are a few new ideas and a few minor changes to review to make this design using FrameShop.
Beginning on the Design Screen
Design the opening, set the reveals, the border widths, and the outside size. Make sure that Dynamic Outsides is de-activated at this point.

To add the new CutArt, click the Add CutArt button at the left of the Design screen. The Browse Content window opens.
Find the Category at the left. In this example it is Accents 2.
Click on it and thumbnails of all the items in the selected Category will appear on the right.
Click on the CutArt you want. In this example it is Petal 01, the one we just saved.
Click the Select button at the upper right, and the CutArt will appear in the center of the design.
Positioning the CutArt
Review the design at the beginning of this article. The CutArt will be a trio of points peeking out of the sides of the opening, just a little below the center.

Move the CutArt to overlap the top layer of the opening. Its final placement is an artistic decision, but there are some devices to help position the CutArt carefully.
Drag the CutArt into its approximate spot, but the mouse is often not precise enough. The arrow keys on the keyboard move the item up, down, left, or right a sixteenth inch per click (1mm in metric). For even more control, hold the Alt key on the keyboard as you click the arrow keys. The item will move 0.01 inch (0.2mm in metric) per click. It will be surprising how handy this is.
To see better, remember the Zoom tools at the lower right. Remember that the left button is the Zoom to Window button. Draw a box around the area of the design that you’d like to see enlarged. That area will then fill the design area. The light-colored area of the thumbnail at the bottom right shows the area of the design currently on the screen. The light-colored area of the thumbnail can be moved with the mouse—or use the sliders at the bottom and right of the work area.
Symmetry
Now that the CutArt is in place on the right side of the opening, we would like to mirror it onto the left side of the opening. But before we add the second CutArt, there is some preparatory work so that alignment will be quick and precise.
Guides are the perfect answer for this.

Guides are the red lines in the work area. They are movable snap points. Guides can be generated in several ways, but this example will review the details of how Guides can be called into the work area with respect to an item in the design.
Right-click on the CutArt.
At the bottom of the menu that appears are 3 choices dealing with Guides: New Vertical Guide, New Horizontal Guide, and New Guide From Other.
Select New Vertical Guide. More choices will appear—Left, Middle, and Right.
Select Right and a guide appears at the right of the CutArt, as in this illustration.
To generate the horizontal guide along the bottom of the CutArt, select New Horizontal Guide, then select Bottom.
Preparing the Snap Points on the Left
In the previous illustration, the bottom of the CutArt was along the horizontal guide. The right side of the CutArt was at the vertical guide.

In the next step, there will be a duplicate of the CutArt for the left side of the design. Its bottom will be snapped to the horizontal guide. Its left needs a vertical guide as a snap point. We will flip the horizontal guide from the right side of the opening onto the left side of the opening. The left side of the new CutArt on the left can then be snapped exactly into position.
The Swap Position Button
Select the vertical guide at the right.
Click the Properties tab at the top. All the pertinent information about this guide will be displayed.
Click the Swap Position button. The values in the Left and Right fields above will switch. More importantly, the guide will move to the equivalent position on the left side of the opening.
The new CutArt for the left side can now be snapped into place with its bottom along the horizontal guide and its left along the vertical guide.
Generating the CutArt for the Left Side
Copy and Paste to generate a duplicate of the CutArt.
Move it to the left side of the opening.
Snap it into place with its bottom along the horizontal guide and its left along the vertical guide.

The CutArt will be pointed the wrong way. Under the Properties tab for the CutArt, there is a Mirror the CutArt checkbox under Options at the left.
Click it. The CutArt will be mirrored and it will point in the correct direction for this design.
Grouping the Elements
With both CutArt elements in place at the sides of the opening, there is one final step.

Select both CutArt items and the opening.
Click the Advanced tab (at the top).
Under Other Options at the left, click the Group Selection button. The CutArt items will be joined with the opening to complete the design.
Saving the Design
Realize that it is unlikely that this exact design in this exact size will ever be cut again. However, maybe this design is a production item to be cut many times. Or perhaps this design will serve as a reminder of the idea and the process. Or just maybe your shop policy is to save every design for every customer—no matter what.
Save the design, but make sure to assign it to a Customer and give it a descriptive Name so that the design will be easy to find using the Search Filters.
Download the Files
The final CutArt file is available here for you to download and use. It is named Petal 01.WCX. There is also a PDF that explains how to load these files into FrameShop in order to use them.
Complete this form to get the design files, and be notified of future articles:
Coming Soon!
Additional projects using even more of the functions of Trace. Be sure to subscribe to our email list, so you’ll be notified automatically via email as new blog articles are published.
Just Launched!
Check out our newly launched Wizard University—now enrolling.
