
A Project Using Trace: A Vignette
/
Brian Wolf, CPF
Art & Education Ambassador
Wizard International
The two parts of Getting to Know Trace showed the buttons and functions of Trace. Now it is time to do something with them.
Let’s see how Trace works and what the possibilities are. The best way to learn the way Trace works, and master it, is through simple projects.
The first project will only involve changing the bevels of the items in the design. The next project will only delete items. Each of the following projects will build in complexity, but each will focus on some different function in Trace and its practical use.
A Vignette Using Letters
Letters or CutArt™ are often included in multiple opening design—typically as a cutout image to reinforce or identify the subject. They can be more than just cutouts, though.
The idea behind a vignette is to add a frame around the letters and cut them on a layer under the mat. This opens up an opportunity to add more colors around and behind the letters. The letter will still be a cutout that helps to identify the subject, but with physical depth and real artistic interest, it will look like an object in the arrangement, rather than just a letter cut out in the mat.

This project begins in the Design part of the program, but there is a Trace step required to complete the vignette. Just as before, if you have experience with PathTrace in MatDesigner, the functions and procedures will ring familiar—but the buttons and the steps may be a bit different in Trace.
Beginning the Vignette in Design
The letters are from the Roman and Greek Capitals LetterMat font. In this design they are 1.75 inches high.
Look at the photo above of the completed design at the beginning. The diamond shape at the bottom is another template opening on the bottom layer with the letters. Template 504 makes isosceles triangles. This triangle is 1.75 inches wide and 1.25 inches high.
The opening surrounding the letters and the triangle uses template 507 Pennant. It is a 2 layer opening, and the inner Reveal is 0.125 inch. Normally this template is used to create a flag shape, but the parameters are set so that a point is generated in the end of the shape, rather than the usual notch.
It is also rotated 90° to turn the point to the bottom.

On the screen, this arrangement looks like it is ready to cut, but the letters, the triangle at the bottom, and the top layer of the pennant shape will all be cut on the top layer. This will not work.
To make this into a vignette, the letters and the triangle need to be cut on a new layer underneath the 2 layers of the pennant shape. These changes can easily be made in Trace.
Send the Design to Trace
To send the design into Trace, first we need to select all of the elements that we want to combine. In this case, that is everything you currently see on the screen. To do this, hold down “Control-A” to select all. Then using the mouse, right-click on one of the select elements and choose “Convert to CutArt” to send the design into Trace.
The Steps in Trace
The illustration below is visual proof that changes need to be made to complete this vignette. All the shapes that are bright colors will cut on the top layer.
In the final vignette, the top layer will contain only the top layer of the pennant shape.
The middle layer will contain only the inner layer of the pennant shape.
The bottom layer will contain the letters and the triangle.
Constructing the vignette like this in Trace not only sets the elements to cut on their proper layers, but it converts these separate elements into one CutArt. Add the CutArt vignette to a design, and it is much easier to position in the design relative to the other openings. It also makes assembly easier. Just stack up the layers after they have been cut.
Adding a New Bottom Layer

Here is the design newly opened in Trace.
Click the Set Bevels tab at the top. Look at the Layers section at the bottom left. You’ll notice there are 2 layers, but we will need to add a third layer.
Click the Add button at the very bottom left of the Layers section.
In the next illustration, you will see that there is now a third layer.
A Review of the Bevel Types
Notice that all the circuits in this design are blue except the inside of the D.
Blue indicates that an item is set to cut as a Normal 45° Bevel.
The inner shape of the D is red because it is set to be cut as a Drop. (Note the color coding for all the bevel types: the button beside the 45° Drop Bevel Type is bright red, and once an item is set to cut as a drop, the shape is bright red.)
A drop is a cutting situation where the dropout is the part that will be used—not the mat around the dropout. The bevels will be visible around the outside of the drop, and its size will be measured from the outside points of the bevels. The starting and ending points of the cuts will be set differently because the dropout must look good, not the mat around the dropout.
After all the pieces are cut, the dropout from the inside of the D needs to be affixed into the inside of the D to complete the letter. Many other letters and numbers (A, B, O, P, Q, 6, and 8, to give a few examples) have dropouts at part of the letterforms.
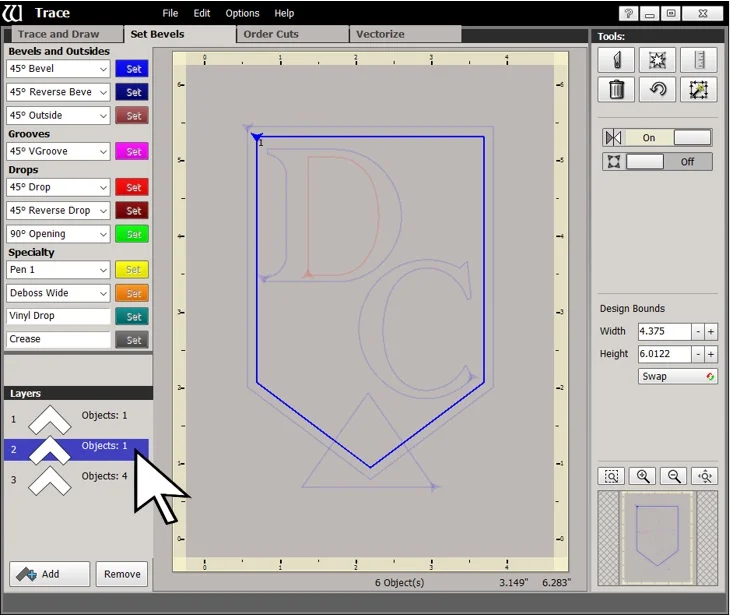
Setting the Bevels on the Bottom Layer
At the bottom left of this illustration, note that there are now 3 layers in this project. The letters and the triangle need to be cut on the new layer underneath the 2 layers of the pennant shape—Layer 3.

Select Layer 3 at the bottom. The blue stripe behind it indicates that it is selected.
First set the inside of the D to cut.
Select the inside of the D. It will turn white.
Click the bright red button beside 45° Drop at the left. The inside of the D will turn bright red, as in this illustration.

We are still on Layer 3.
Now select the outside of the D, the C, and the triangle.
Click the bright blue button beside 45° Bevel at the left. All the circuits will turn bright blue, as in this illustration.
Recall the discussions from Getting to Know Trace—Part 2 about setting starting points and cut order. Though there are several items to be cut on this layer, they are neither so small nor so close together that cutting order or starting points become critical.
The Bevels on Layer 2
At the bottom left, in the Layers section, select the middle layer—Layer 2. The bright blue shape is the inner circuit of the flag shape. This is precisely what should be cut on Layer 2—there is no need to change anything.
The Bevels on Layer 1

Select the top layer—Layer 1. The bright blue shape is the outer circuit of the flag shape. This is precisely what should be cut on Layer 1—there is no need to change anything. The vignette is now finished.
Saving the Vignette
This vignette will be used alongside an opening or a group of openings. In order to add it to a design, it is necessary to save this vignette as a CutArt™. Actually, all things created in Trace will be saved and used as a CutArt, so this will serve as an example of the normal process.

Click File at the top left. The most practical saving choice is Save To Database. This puts the new CutArt into the database, and it will be ready to use in FrameShop without further processing. The Save CutArt dialog box will open.
First choose a Category. It is possible to save the vignette into an existing Category. Click the drop down arrow at the right of the Category Name field. Select the Category for the vignette from the list. It is also possible to enter a new name and create a new Category. In this example, the new category is Vignettes.
Enter a name for the new CutArt, and click Save at the bottom of the dialog box.
That’s it!
Download the Files
There are 2 files to download and examine. The first is a mat design file named: “DC and Banner Start.WZX”. It is the beginning of the design on the design screen, and contains the letters, the triangle shape, and the flag shape. The letters, their sizes and spacing, the outside shape, and the triangle can all be changed or deleted to suit a new project. The other file is the finished vignette named: “DC and Banner.WCX”. There is also a PDF that explains how to load these files into FrameShop in order to use them.
Complete this form to get the design files, and be notified of future articles:
Coming Soon!
Additional projects using more of the functions of Trace. Stay tuned…
